


What is a dropdown menu?
It’s when you click on a link and multiple links appear below it. You will often see dropdown menus at the top of websites in their navigation bar. Having a drop down is a great way to declutter your header (navigation) while still sharing your main links at the top of your site.
Your top navigation is prime real estate on your website.
- There’s a lot of SEO juice in your header. The links you add here tells Google these are the most important pages on my website.
- This is the first thing someone will see when they land on your website. And you can use these links to guide the user to take action and go to those important pages.
You don’t want to have too many links in your header because it can distract users. We want to lead them to higher converting pages. The problem occurs when you have a lot of high converting pages and can’t list them all on your header without it looking overwhelming or messy.
This often happens when you offer multiple types of services or shop categories. And I do want to mention here, if you have multiple services you should have a separate page for each. You can target each specific service with SEO. This is much better than having one page that shares multiple services. Google won’t understand what you’re trying to share on that page because there’s too much to choose from. Each page should be unique and specific. Same thing goes for a shop, you should have categories for different product types.
And this is exactly where we want to use the dropdown menu! So let me show you exactly how to add it to your top navigation!

You know you need a website for your business but you have no idea where to start?
Don’t worry, I got you!
Sign up below to download your FREE Website Content Roadmap to get started!
How to create dropdown menu on desktop in Showit
Design your menu so it looks exactly how you want it to when it’s a closed menu (before the drop downs appear).
Then on the left hand side select the three little dots next to the canvas title and select canvas view.

You will see a little folder pop up right below your canvas title labelled view 1. I like to change this title to closed menu.
Select all of the elements you want to add to this canvas view. This will be everything that shows up on the desktop version of your menu. So you can see in the example below. Everything is added to this canvas view except for the hamburger icon which is only visible on mobile.
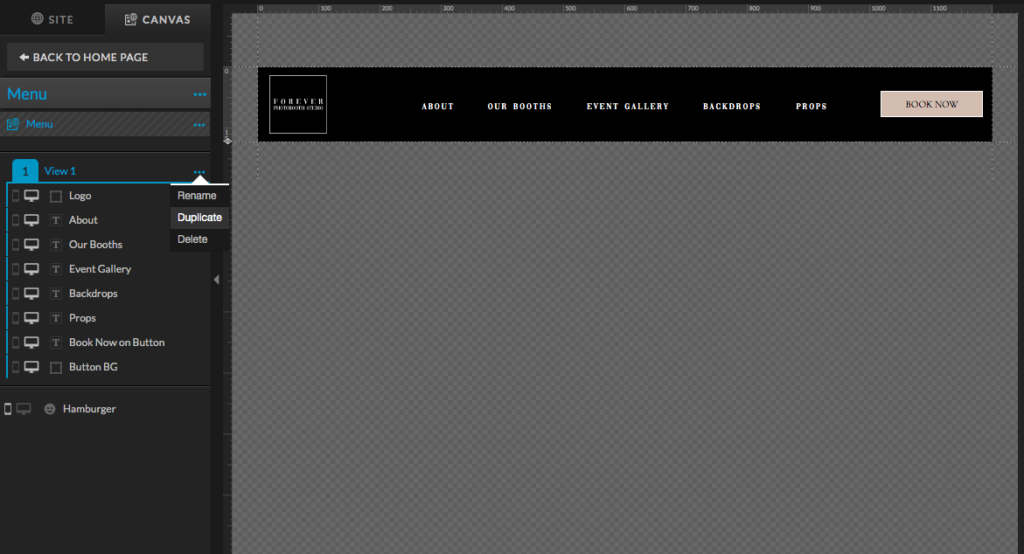
Now we want to duplicate that canvas view. You can see in the image above, all you have to do is select the three dots next to the canvas view and select duplicate.
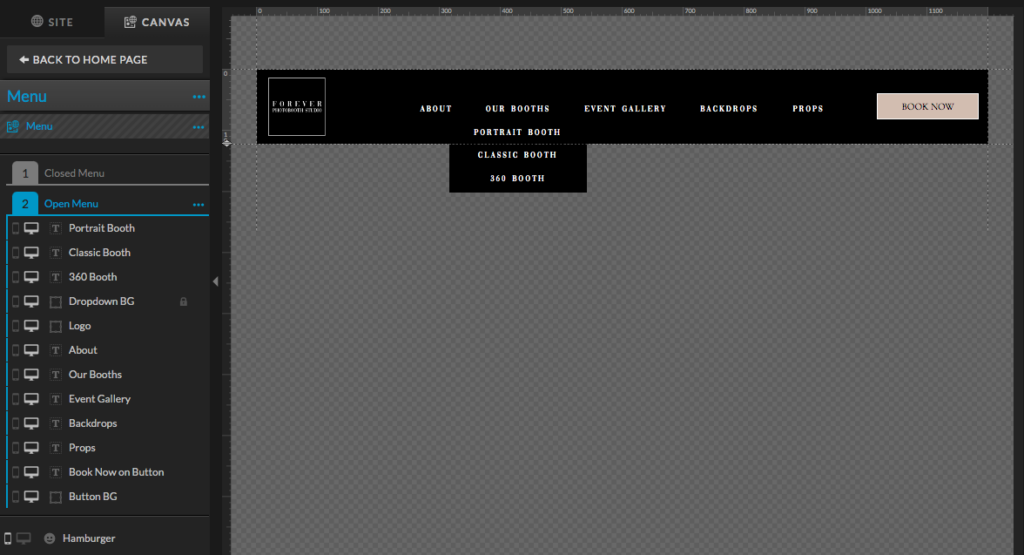
This will make a copy of that exact folder. So you will have a second canvas view that looks exactly like the first (I like to name this one Open Menu). This is why it’s so important to make sure you have designed your header exactly how you want it to look. Otherwise you would have to redesign it in the second canvas view and it can become a lot of work.
At this point we have two menus in separate canvas views that look exactly the same!
Now we want to add our dropdown menu to the second canvas view, the open menu.
First, add a rectangle and add it right below the link you want the dropdown added to. Make sure the rectangle is the same color as the navigation menu. We want it to look like an extention of the menu and look seamless.
Then duplicate the one of the menu links so we have the same styling. And paste them right underneath the link that will dropdown. So these links will essentially be right on top of that rectangle we added.
Rename the link appropriately. Once we have added all of these elements I like to make sure everything is lined up correctly. I will select all of the links that are in that row and make sure they’re aligned and evenly distributed. Also make sure your rectangle is lined up correctly as well!
You can see what all of this looks like in the image below. Remember, this is all in the second canvas view.
Make sure that all of these elements we just added are only visible on desktop!
Congratulations, You now have the design of your drop down menu! All we have to do now is apply the settings to make it all function.
Adding click actions on canvas view one (closed menu)
Let’s start with your closed menu here.
Select each element to add a click action. A click action is what is going to make that specific element do something. So in this case we want the logo, the links and the button to take us to different pages on the website. I will show you how to do this once and you can apply all of the click actions for each element.
Select the text box. On the right hand side select Click Actions. Select Page from the Type drop down list. And select the appropriate page from the Page drop down list.
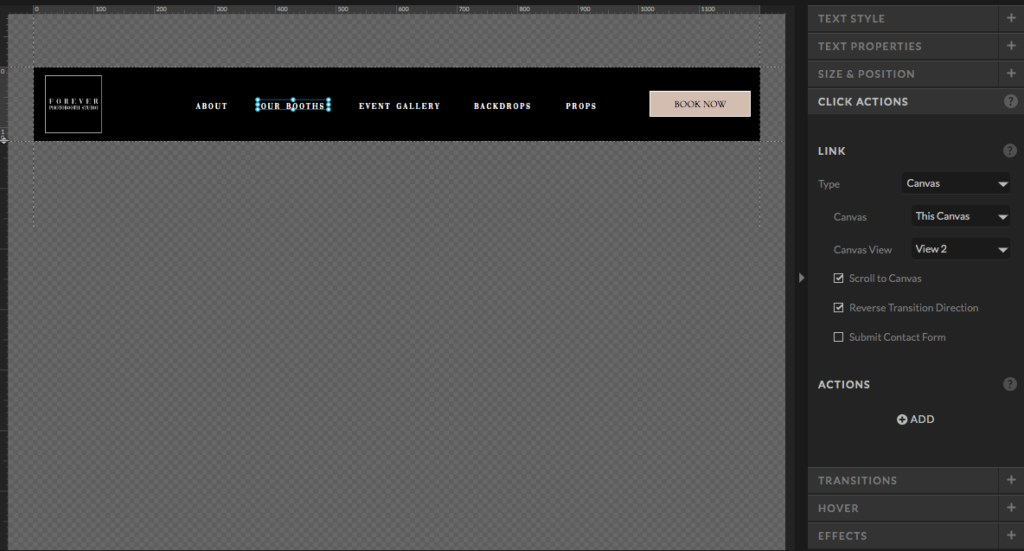
Repeat this for all of the links, the logo and the button. EXCEPT for the link that will have the dropdown. So in this example we want Our Booths to show Canvas View 2 (Closed Menu) instead of taking us to another page.
See example below.

You can see how to show canvas view 2 in the image below. You would select the link and on the right hand side select Canvas from the Type drop down. Select This Canvas from the Canvas drop down. And select View 2 in the Canvas View drop down.
Now each link will take us to the corresponding page except for Our Booths. When a user clicks this link, the dropdown menu on canvas 2 will appear.
Adding click actions on canvas view two (open menu)
Here you want to do the exact same thing. Link each element to the corresponding pages EXCEPT for the link with the dropdown menu. In this case the “Our Booths” link.
Select “Our Booths” and follow the same steps as you did for this element on canvas view one. But this time select Canvas view 1 from the Canvas view drop down instead of Canvas View 2. So basically, if someone selects this link when the drop down is open it will take them back to View 1 which has a closed drop down.
Apply the Page click actions to each of the drop down links on this page as they will lead users to corresponding pages.
Add scroll action
The last thing we need to do to make all of this function is add a scroll action. With Showit, unless you’re using code, the user will have to click on another menu item to close the menu. The dropdown menu does not close when user hovers off of it. What we can do to make this flow a little easier is add a scroll action. What this will do is make the drop down menu disappear when the user starts to scroll down the page.
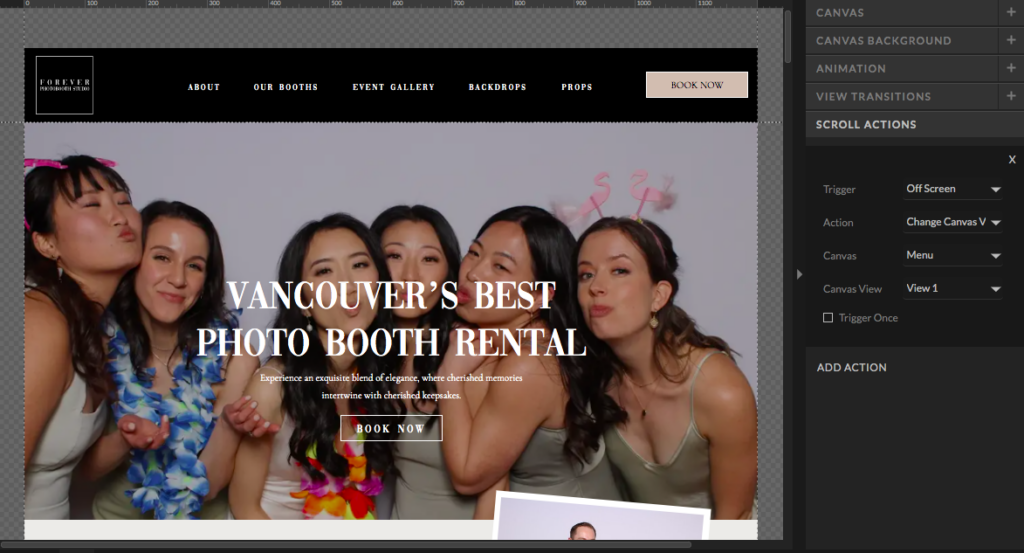
You can see I have selected the scroll action I have already applied to this page on the left hand side. How you do this is by adding a blank canvas and minimizing it to the smallest height we possibly can. Which happens to be 1px. Then drag that small little canvas right under your Menu canvas. Make sure this is only visible on Desktop as we are not using it for Mobile.
You can see all of the canvas settings on the right hand side. The only one you really need to worry about is making sure the canvas height is 1px.

Then we just have to apply a few settings under the Scroll Actions drop down on the left hand side.
You can follow exactly what’s showing on the image below.
- Select Off Screen from Trigger dropdown
- Select Change Canvas View from Action dropdown
- Select Menu (or the name of your canvas) from the Canvas dropdown
- Select View 1 from the Canvas View dropwon
This will make it so the dropdown menu disappears when user scrolls passed this canvas. And since we have made this a tiny 1px canvas your users will not see it but the action will be applied. This is why the placement of this canvas is so important because it triggers right when it moves off the screen. So it needs to be RIGHT underneath your menu canvas.
I hope this was helpful! If you were able to successfully add a dropdown menu to your website I am so proud of you! This is a big accomplishment as it’s not always easy to do!
If you have any questions you can always shoot me an email! Or book a free consultation if you want me to pop in and help you update your site!

You’ll also love…
How to add Transition Effects on Showit Website
Custom Website Design or Template Customization
Blogging for your business: How to use SEO to grow your business
