


You can create some really unique image hover effects on Showit without having to use any code!
Isn’t that the best news!? If you are a designer who does not code or a business owner DIY-ing your website, you don’t have to worry about code. You can have a beautiful design layout that captures your users attention without worrying about learning HTML. I hope this makes you just as excited as it made me when I learned the news!
In this post I will walk you through how to create the following image hover effects on Showit:
- Show a second image when you hover over the original image
- Zoom into the image when you hover over it
- Show text on top of image when you hover over it
- Show text on a background when you hover over image
All of the effects will be created in a similar way and I will walk you through every step for each of them!
So let’s get into it…

You know you need a website for your business but you have no idea where to start?
Don’t worry, I got you!
Sign up below to download your FREE Website Content Roadmap to get started!
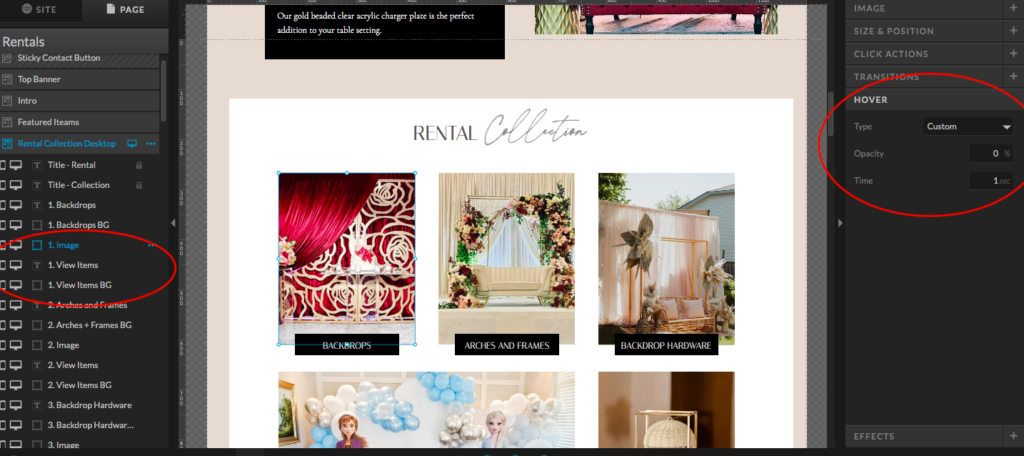
Show a second image when you hover over the original image
Steps to follow:
- Upload both images to Canvas
- Make sure the dimensions are the exact same size (width and length). We want the second image to be hidden right behind the first.
- Layer the top image above the secondary image
- Select the “top image” and select “hover” on the right hand side
- Select “custom” from the type drop down
- Set opacity to 0%
- Set time to 1.5 (or however long you want it to take for the top image to fade away)
- Hit Publish!
Zoom into the image when you hover over it
These steps will be exactly the same as above. The only difference is that the second image you add should be a zoomed in version of the top image. You will do this before you upload your images onto Showit. Take your top image and duplicate it on your desktop and crop the duplicated image so it appears to be a closer look at the same image. You will have this zoomed in version as your second image. So when someone hovers over the top image it shows a zoomed in version of it!

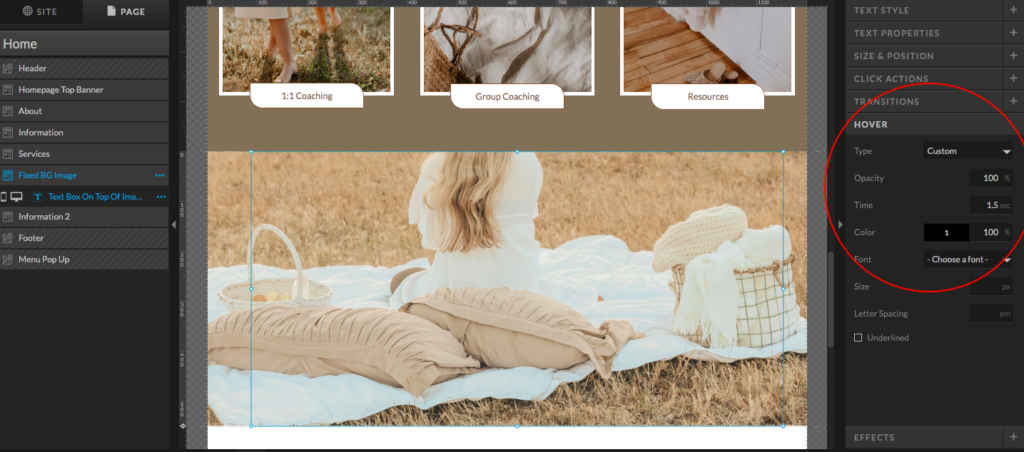
Show text on top of image when you hover over it
Steps to follow:
- Upload image to your canvas
- Add text box above image
- Stretch the text box to cover the image so when someone hovers over any part of the image the text will show.
- Center your text
- Set the font to 100% transparent so it is completely invisible
- Select “custom” from the type drop down
- Set opacity to 100%
- Set time to 1.5 (or however long you want it to take for the text to appear)
- Select the color for the font
- Hit Publish!
Show text on a background when you hover over image
This one is going to be built up of a few different layers.
- The image itself
- A background behind the image
- And the text box
Steps to follow:
- Upload image to your canvas
- Add a background right behind the image. Make sure this is the exact same size and shape. We want it to hide right behind the image.
- Add text box
- Layer these three elements in this order
- Image on top
- Text box right below image
- Background below both
- Select the image and select “hover” on the right hand side
- Select “custom” from the type drop down
- Set opacity to 0%
- Set time to 1.5 (or however long you want it to take for the top image to fade away)
- Hit Publish!
You will also love…
How To Add Your Font Style And Colors On Showit
How Does A Showit Blog Work With WordPress
Manifesting Success: Designing a Website for Your Dreams
Using the WordPress Yoast plugin for your Showit Blog
Website SEO for Holistic Entrepreneurs: Attracting Your Tribe Organically
