


A testimonial slider is a great way to showcase multiple client reviews without clutter!
In this post I will show you step by step how to create a testimonial slider on Showit. And of course you can use these exact steps to get creative with your website. You can use it to transition through different images, provide more information, etc.
Here are the exact steps we are going to work through:
- Add a new canvas (we will also discuss the difference between a page canvas and a site canvas here)
- Design canvas and add your first testimonial
- Create a canvas view
- Duplicate canvas view for each testimonial
- Apply settings to navigate back and forth between testimonials

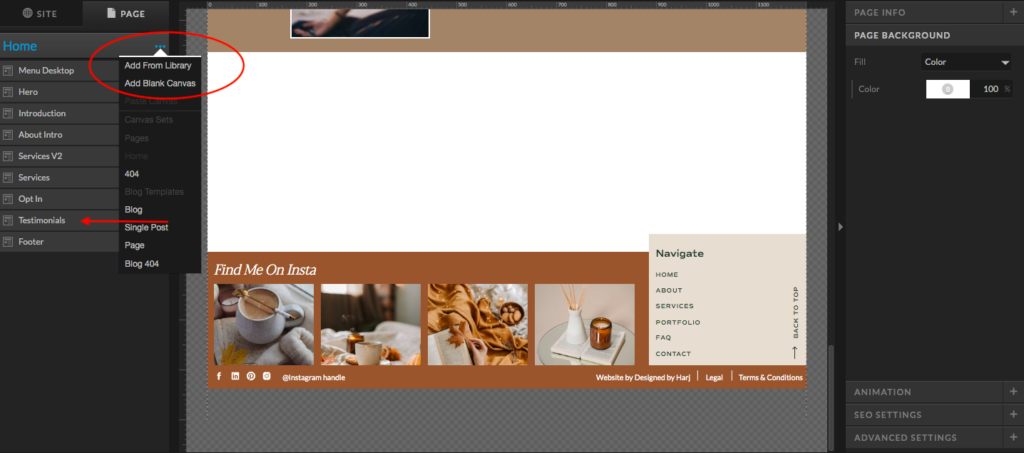
Step 1: Add a new canvas
Go to the page where you want to add your testimonial slider. Select the three dots next to the page title on the left hand side and select “add blank canvas”. You will see the canvas added to the bottom of the list, rename the canvas to Testimonials (or whatever name you’d like here) and drag it between the canvases where you want your testimonials to be.
Before we start designing, I just want to touch on the difference between a page canvas and a site canvas on Showit. And why you might choose one or the other!
For starters, a canvas is basically a section on your web page. Each page of your website is made up of multiple sections, aka canvases.
Page Canvas
A page canvas is a stand alone section. It exists only once on your website. So if you edit a page canvas it will only edit that particular section on your website.
Site Canvas
A site canvas on the other hand can exist multiple times on your website. If you edit a site canvas on one page and it exists on another page it will automatically update on both. This is super helpful for sections like your Top Navigation Menu, Footer, and Testimonial Sliders if you want them to show up on multiple pages. It makes life a whole lot easier because you don’t have to worry about making the same edits more than once.
And just in case it wasn’t clear, you do get to choose exactly which pages on your website have which site canvas added. You can always convert a site canvas back to a page canvas if you want to edit something on one page only.
If you want to learn more about the difference between a page canvas and a site canvas you can read more here.
You know you need a website for your business but you have no idea where to start?
Don’t worry, I got you!
Sign up below to download your FREE Website Content Roadmap to get started!
Step 2: Design canvas and add your first testimonial
Now is the fun part, add your first client testimonial and design your canvas. If you have an image of your client you can add that here as well. Having a picture of your client is great because it connects deeper with your website visitors. They can see the person you helped which makes the testimonial that much more powerful.
Be sure to add arrows so your visitors can navigate through your testimonial slider. You could apply settings to move through the slider on a timer however I wouldn’t recommend that for testimonials. You want users to be able to take their time with reading the results you’ve provided and have the options to go back and forth.
It’s a good idea to avoid placing your arrows directly below your testimonial text. Some client testimonials will be longer than others and you don’t want the text to start overflowing on top of the arrows if one does happen to be longer.
You can see in this screenshot here I have designed the testimonial slider with the arrows above the testimonial text and added an image.
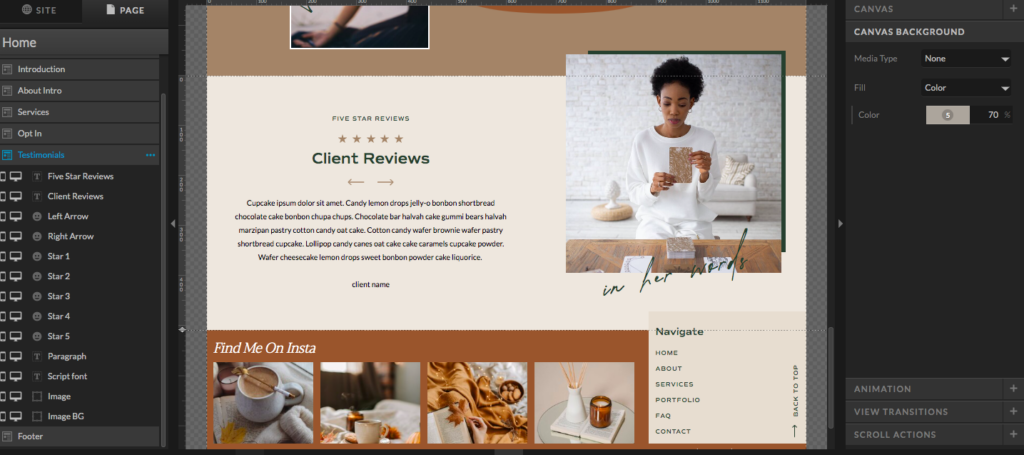
Start to think about which elements you will be swapping out for each client testimonial and which ones will stay the same.
In this case the following will stay the same:
- The title
- Subtitle
- Stars
- Arrows
- Script font
- The border around the image
The only things that will change for each testimonial will be the actual testimonial, so the paragraph text, and the image.
Which takes us to our next step.
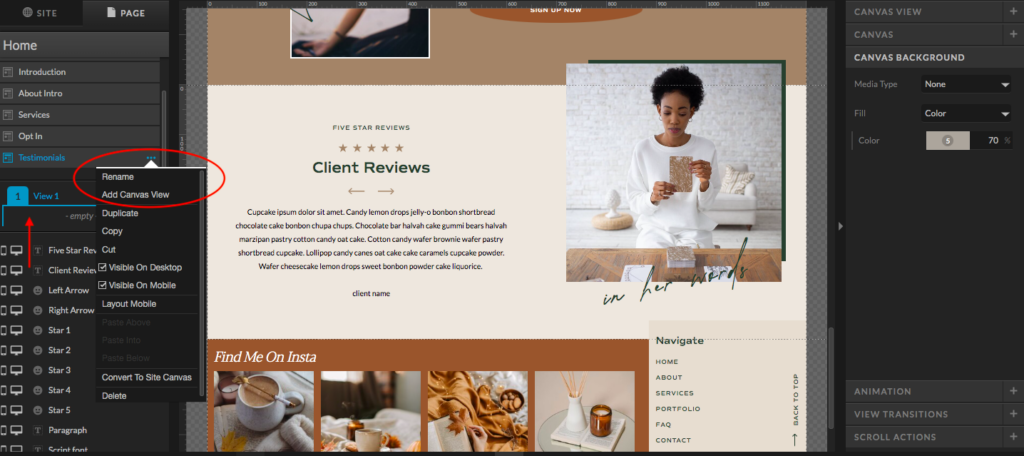
Step 3: Create a canvas view
Select the three dots next to testimonials (or the name of your canvas) on the left. As you can see in the image below this will add a canvas view. This is essentially a folder within your canvas. Each folder can have different elements which are only visible through that specific folder.
In order to create a testimonial slider each canvas view will have a different client testimonial. And in this case a different picture as well.
So what you want to do is select and drag any element that you want to only show on that specific canvas into your canvas view. In this example it will be the Paragraph element, which is the text box with the client testimonial, and the image. Everything else will always stay the same no matter who’s testimonial the user is reading.
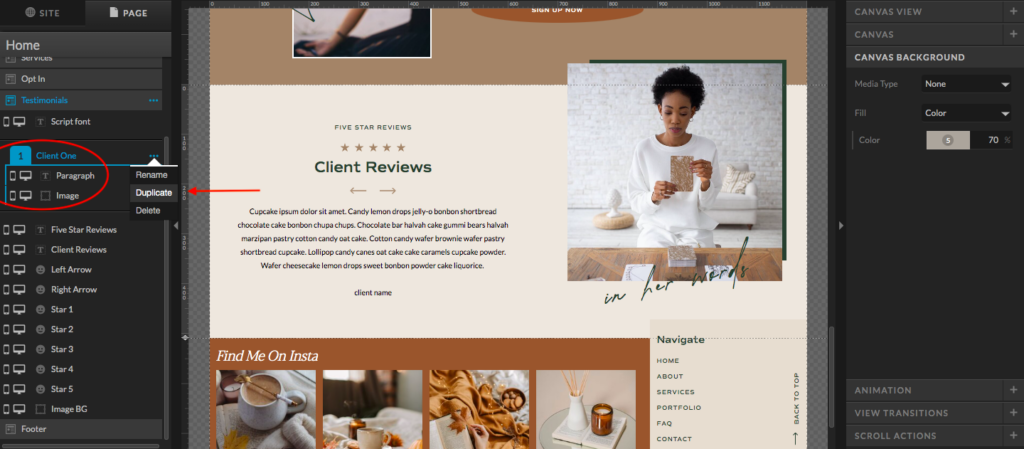
You can see the new canvas view in the image above with the paragraph and image elements added to it. I always change the name of the canvas view to the name of the client just to stay organized.
You can also see that I have dragged the script font above the canvas view folder. This is for layering purposes. If I left the script font below the canvas view it would be hidden behind the image. This is the same as layering your elements when designing.
All of the elements outside of canvas views will always stay the same on your web page therefore they are left out of the canvas view.
Step 4: Duplicate canvas view for each testimonial
In the image above, I have also selected the three dots next to the canvas view to show you how to duplicate it. To add more reviews to your testimonial slider just duplicate the canvas view you have already created and just swap out the text and image.
Remember, your very first canvas view will always be the first one that shows on your website. So if you have a specific testimonial you want to show first just drag it to the top of all canvas views.
You can continue to duplicate for each review you want to add.
Now to make this actually function!
Step 5: Apply settings to navigate the testimonial slider
All we need to do now is apply settings to make the arrows transition back and forth between canvas views (your testimonials).
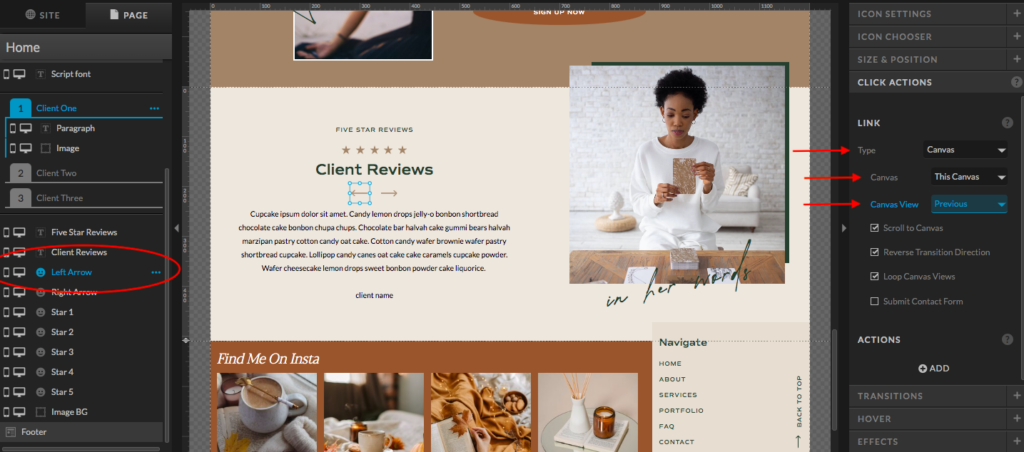
- Select the left arrow and go over to Click Actions on the right hand side
- Select canvas from the type drop down
- Select this canvas from the canvas drop down
- Select previous from the canvas view drop down
- You can leave the rest of the settings below it the same
- Do the exact same thing for the right arrow except instead of selecting previous from the canvas view drop down, select next.
And that’s it! Not the worst was it?
Remember to hit Publish and view your testimonial slider on your browser to make sure it’s functioning correctly and looks “chefs kiss”.
You will also love
How to add Image Hover Effects on Showit
Using the WordPress Yoast plugin for your Showit Blog
How To Add Your Font Style And Colors On Showit
